 Cassandra.org
Story
I started out trying to solve a single problem and I wound up with a beast
of a project that had me spend all my waking hours for 4 days in a 4 ft. by
5 ft. area. The problem I was trying to solve was to be able to go away on
vacation for 2 weeks in the summer and not have to find someone to
chlorinate the pool or return to a green swamp. In the Texas heat of
summer, it is required to be putting chlorine in every 3 to 5 days.
I'd found and researched a product called Nature2, which uses silver and
copper to sanitize the pool. With these elements in small qualities in the
water, you can keep the chlorine level much lower than normal. Physically,
it is a vessel with a place to put the special cartridges and another place
for putting a few weeks worth of chlorine tablets. You plumb this on the
return line to the pool from the pump to get the water to flow through the
filter and chlorine. You have to install a check valve though so highly
chlorinated water does not back up into your motoprs/pumps by gravity when
the pump motors are off. The promise of this device is that I will now be
able to go 2 weeks without chlorinating the pool in the summer (if needed).
As of this writing (Feb 2011) we have not hit a summer yet, so I do not
know if this is true.
Inserting this new device into the existing PVC plumbing is pretty simple
in concept: cut the PVC return line in some suitable places and insert some
pipes to route it to this new vessel and back again (with check valve).
The main problem is that the pool pad area is not very big, and the
existing arrangement is far from ideal making insertion hard and
convoluted. When pool installation folks put pool equipment pads in, they
are optimizing the amount of plumbing and electric work they need to do.
So all the lines are as short as possible. This is exactly the opposite of
what you want when you are the person that will be maintaining it for
decades. So installing this simple device turns into some amount of
re-plumbing to be able to fit everything in that area.
As I tried to figure out how to re-arrange things to accomodate this new
piece of equipment, I realized that the reason that everything is so hard
to work on is that the intake and electric come out of the ground right in
thbe middle of the pool pad area. So there is always plumbing and electric
in the way no matter what you are trying to get at. A much more ambitious
plan than just replumbing would be to actually dig up the ground and move
the pool intake and electric service to the permimeter of the pool pad area
and free up all of the space. This would be a lot more work, but would
make my future life much easier. I was on the fence about how ambitious to
be.
A secondary thing I was needing to fix was the pool pump timers. I have
two pumps: one is the main filter pump and the other is the booster pump
for my Polaris automatic vacuum, which is probably the best pool invention
ever. We call him "Bob" and I've never had to vacuum my pool because of
him. I decided to replace our old-school mechanical timers with an
electric one that would offer more flexibility in timing the pumps and Bob.
It also just so happened that Bob's pump motor failed a couple week's
before, so this was another item I had to take care of in this pool pad
work.
Researching this new timer, after settling on one I stumbled upon a new
idea which this timer supported: two-speed pool pumps. A pool pump needs to
run pretty often, especially in summer to keep the water and chemicals
circulating. The amount of power need to run a pump is obscene. It can
often be the bulk of your electric bill ($80 - $100 a month). A two speed
pump allows you to run it a full speed when you need a lot of circulation,
but also allow half-speed operation that keeps the water flowing, but uses
a quarter of the power. The nature of the physics of the pump is such that
you only need 1/4 of the power to run the pump at half the speed. To get
these savings does require a new pump though, but it can easily pay for
itself in less than a year in electric savings. The general rule of thumb
is that you need a pump to circulate enough water to replenish the volume
of the pool two times a day.
So here I am with a new timer, two new motors/pumps, and new piece of
equipment to put in and will need to completely re-do the plumbing. I was
still not sure I wanted to get involved with diging up the ground and
moving the intake line and electric. There's valves at the intake and
outtake, so you can turn them off and replace the entire plumbing in the
pool pad area. However, if you want to move them, you have to cut out the
valves, which means you need to find a way to stop the water since the pool
pad is below the water level of the pool. I was not really sure how to
stop the water.
A combination of trips to the local home improvement stores and buying
equipment on-line, I slowly gathered all the equipment for this project.
Day 1 - The Ordeal
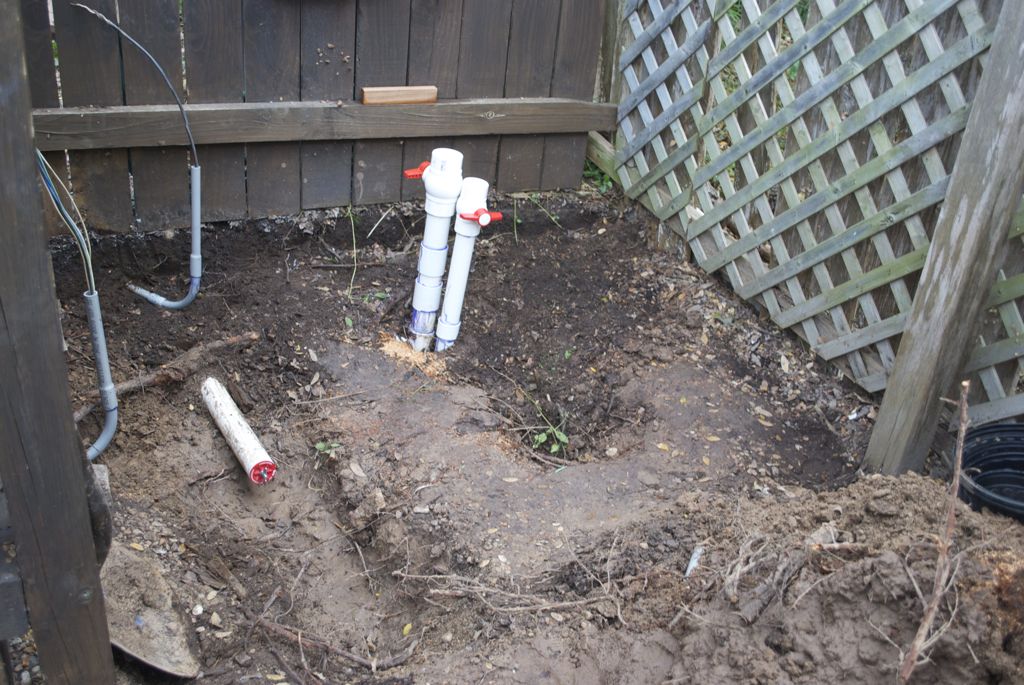
After the excavation: old intake/outake stems and diconnected electrical wires.
I began with an impressive array of accumulated parts: pumps, timers,
plumbing, connectors, valves, electrical conduit, wire, etc. and on one
fateful Saturday morning, I went out to the pool pad to begin scoping
out the work I needed to do. I started tenatively, still not sure just
how much reconfiguring I wanted to do. My friend happened to stop by
when I just had done a little diconnection work, so I went and
discussed with him my plans and the choices I had to make. He was much
more ambitious than I was feeling and basically said that I should go
all out and do the whole nine yards of digging everything up and moving
things.
While this was easy for for my friend to say, he also stuck around for
a long while helping me dig up the entire area, which was a massive
chore due to the small space, all the obstacles and many rocks and
roots. Add to this the fact that the old valves were not in great
condition, and we were very quickly ankle, and sometimes knee deep in
mud. Digging all this up was not something I would have been able to
accomplish myself, since I had a degenerative hip problem and it was a
major effort in all sorts of awkward positions. The picture at right
is what it looked like at the end of the first day. It was clear that
my two-day weekend project was going to be going overtime. While I
appreciated the help in excavating the area, I would be on my own for
the remainder of the project.
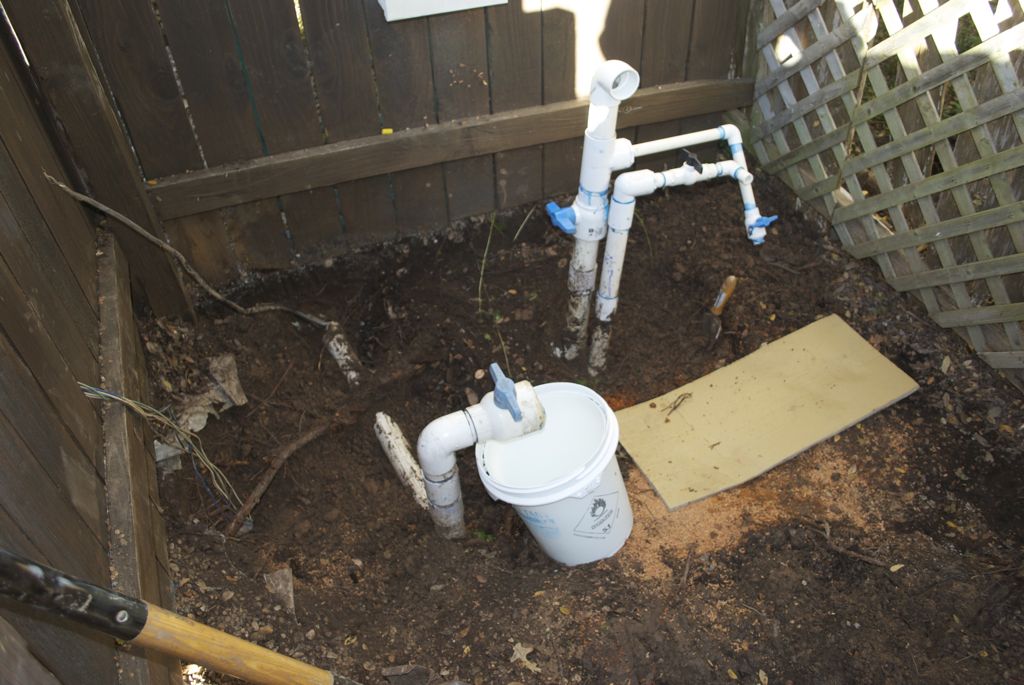
Cut and capped intake, new outake plumbing stems and new electric conduit.
Beginnning on Sunday, Day 2, I had nothing but the old intake and
outake stems and electric wires poking up from the ground. The outake
lines (one for main return and one for the Polaris pool cleaner) were
actually in a decent location on the perimeter, but I would have to cut
the pipe below the valves to be able to have enough pipe to work with
in the new arrangement. So I had to figure out a way to prevent the
water from coming back down the outtakes. The intake line was to be
relocated, so that too had to get cut and replumbed before the valve,
so there too I would need to figure out away to prevent water from
coming back from the skimmer. Neither of these was going to be easy,
short of draining the pool, which I wanted to avoid.
Before dealing with the water, I wanted to first clean up the danging
electric wires, so put in new electric conduit once I decided where I
wanted them to come up. I was constrained by the length of the
existing wires, since I did not want to have to add running new wires
to this rest of this project's tasks.
In what would be the first of more than 10 trips to the home improvment
and pool stires in the coming few days, I went in search of rubber
stoppers, caps and all sorts of things to help me stop the water flow.
After a bunch of failures, I was finally able to block up the outake
lines enough to be able to cut the old valves off and put a new one on.
One down, one to go.
I went through many attempts and failures to block up the skimmer to
prevent water coming down the intake line: nothing was working, and
much mud was being created as I tested various schemes. I wound up
with no choice but to drain the pool below the skimmer level. Had I
done that from the get-go, I would have saved myself a lot of time,
money and aggravation.
Day 2 - Rebuilding the Infrastructure
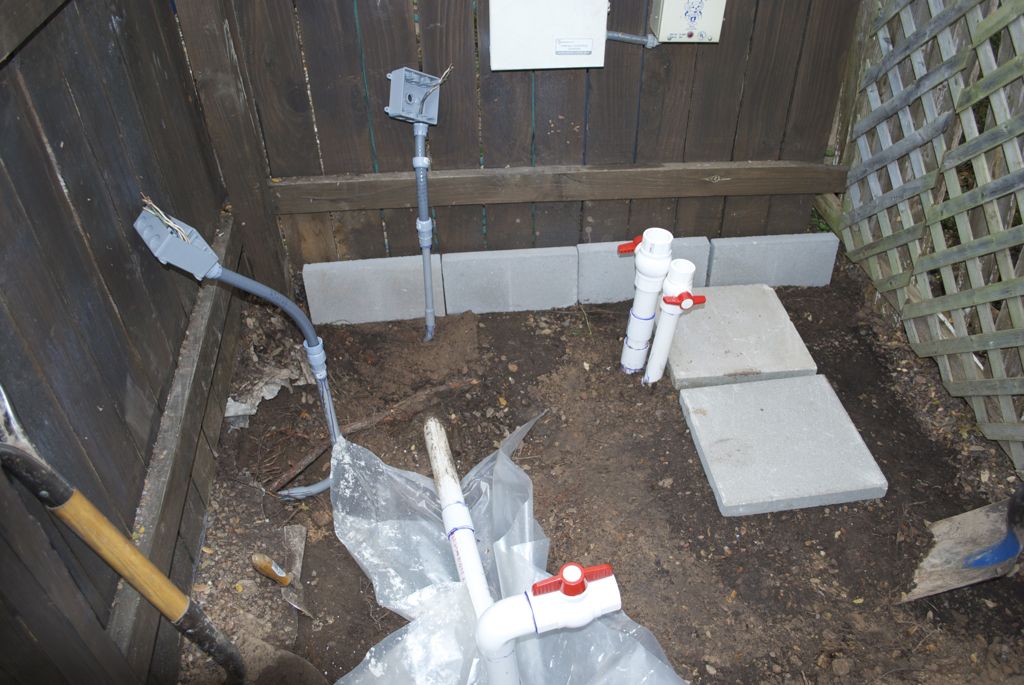
New locations, valves, conduit and flooring..
I was finally able to cut the intake line and extend the underground
pipe so it processed to the further perimter of the pool pad area. The
tricky part was knowing at exactly what height the intake line needed
to go horizontal, since it had to exactly match the height of the pump.
Problem is that the pump is not installed and the ground was dug up, so
how could I have any idea ho high the pump would be? Tricky business.
Also, it better be going parallel to the ground, or else I'd have to
put my pool pump on an incline to line it up. I tried my best, but
still wound up with needing a whole lot of trial and error of grading
the ground in various ways to get the level and angle of the pump to
line up once I had the PVC in place.
Having been in mud for the last couple days, I was anxious to add
concrete stepping stones throughout the pool pad area so that I would
have as little mud as possible to deal with now and in the future. The
new "flooring" for the pool pad was an idea developed in progress and
resulted in at least two trips to the home improvement store.
I finally had the intake and outake lines moved, new valves in place
and the electric conduit moved with electrical boxes on the electric
lines. Besides filling in the holes and grading the area, everything
else is now "new" work, which should be a lot smoother sailing.
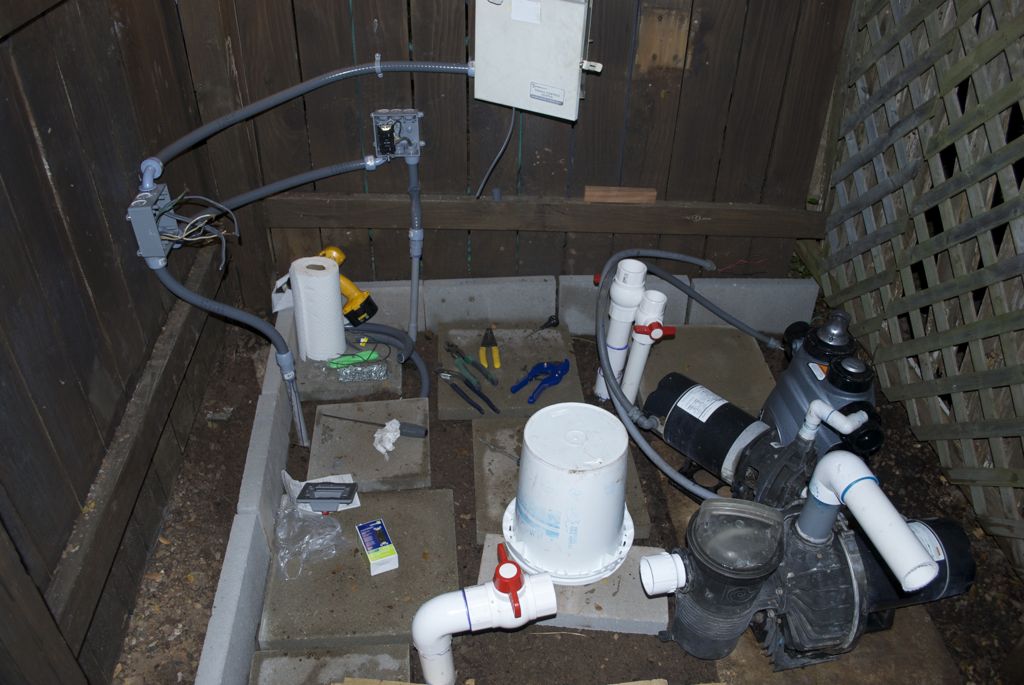
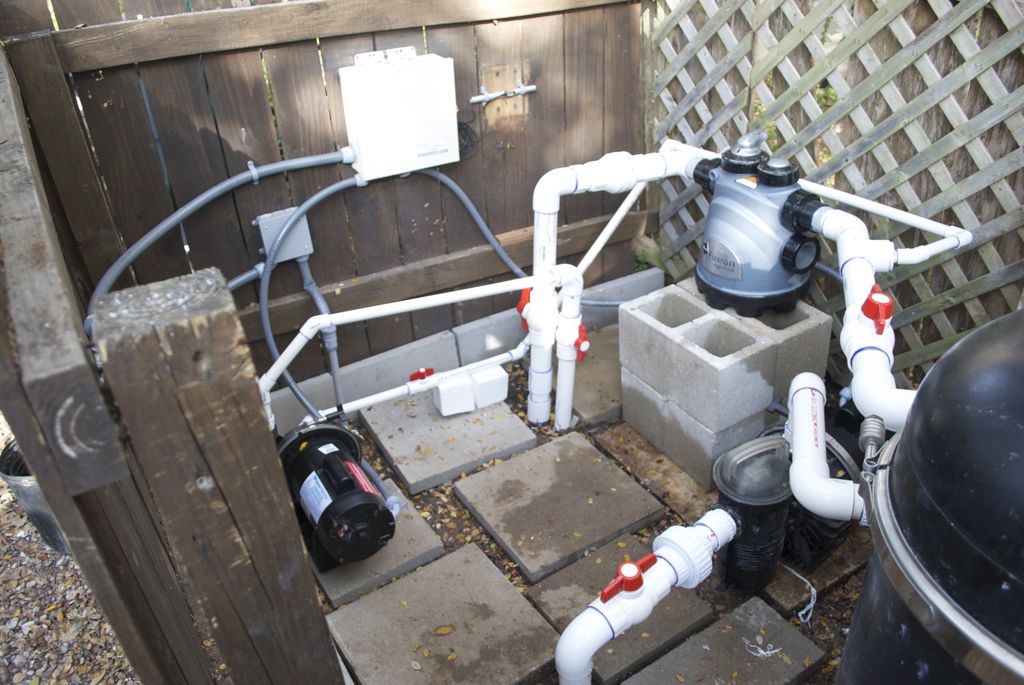
Electric done, plumbing being planned.
Because I had never wired a two speed pool pump and timer before, and
because I have never undertaken doing this much PVC plumbing work, I
went very carefully, which means slowly. Also, because I had invested
so much time, effort and money, I refused to cut corners on a lot of
the minor details, which usually meant going out to the store to get
the "right" part. One instance of this (there were many) were the
colors of the electric wires. I had plenty of wire, but not of the
right colors that would help make it easier to work on in the future.
I also wound up doing many things twice. I would do it, have some
doubts about decisions I made, then do some Internet research to see
what others had to say. Invariably I'd find that I should have done
something slightly differently, so I would.
I've more experience with electrical work than PVC, so I got that out
of the way first. I had still not actually decided how the equipment
would be arranged, so I could not start the plumbing before that. The
picture at right shows the completed electrical work and the initial
laying out of the pumps and other equipment. You'll see an outlet in
the PVC electrical box. That's a no-no as was evident by the fact that
the screw holes on the outlet did not match the box. I found this out
the hard way and wound up removing it rather than installing the
required metal box in the area. I had also plannedon putting a
electric subpanel there to more easily allow turning the breakers on
and off, but I chickened out since I was not sure how to wire it and
did not want to delay more hours figuring it out.
Day 3 - Plumbing Disaster
I finally had the two pumps and the Nature2 vessel arranged so the
plumbing would not be too convoluted and each piece of equipment could
be easily accessed and worked on. Now to run the PVC plumbing. It's a
little tricky to line it up, but with careful measuring and cutting, I
was doing a great job. My only lingering doubt was the few threaded
joints I had. I'd read conflicting reports about whether to use putty
or teflon tape on PVC and eventually decided to use the teflon tape.
I got the the very last two PVC gluing points: the intake and outtake
on my brand new Nature2 vessel. These are unions, so that the union
glues into the main system, and then the vessel screws it the unions on
both ends. A union consists of two pieces: a non-threaded part that
you permantly glue to your plumbing, and the collar that goes around it
that seals and screws onto the vessel which must be put in place
before you glue it. Wanting to be very careful about not getting glue
on the threaded part of the unions I put them aside while I was gluing
everything. In a dreadful moment of excitement at arriving at the end,
I forgot to put them back on and glued up the piece. I came as close
to crying as you can without actually crying.
Of all the plumbing pieces I could have screwed up on, I could have
fixed any of them by buying areplacement part: except for these. These
parts that were now glued in were special to the Nature2 vessel. They
were non-standard in size, and were not available anywhere, which I
found out as I frantically visited all the home improvement and pool
stores. I did get some advice on using an "inside" collar after
cutting the pipe, but this looked mighty shady and I worried it would
leak. The outside of PVC is smooth and has close tolerances to ensure
a good fit. The inside diameter is rough and has loose
tolerances. However, it was the only hope I had and I gave it overnight
for the glue to dry to give the best possible chance of working. I
took the extra precaution of adding some special putty that hardens and
is waterproof as insurance against this patch work.
My beautiful plumbing job was now ruined with these ugly patches.
Worse of all, I had my doubts they would actually hold water under
pressure.
Day 4 - Done but Leaking
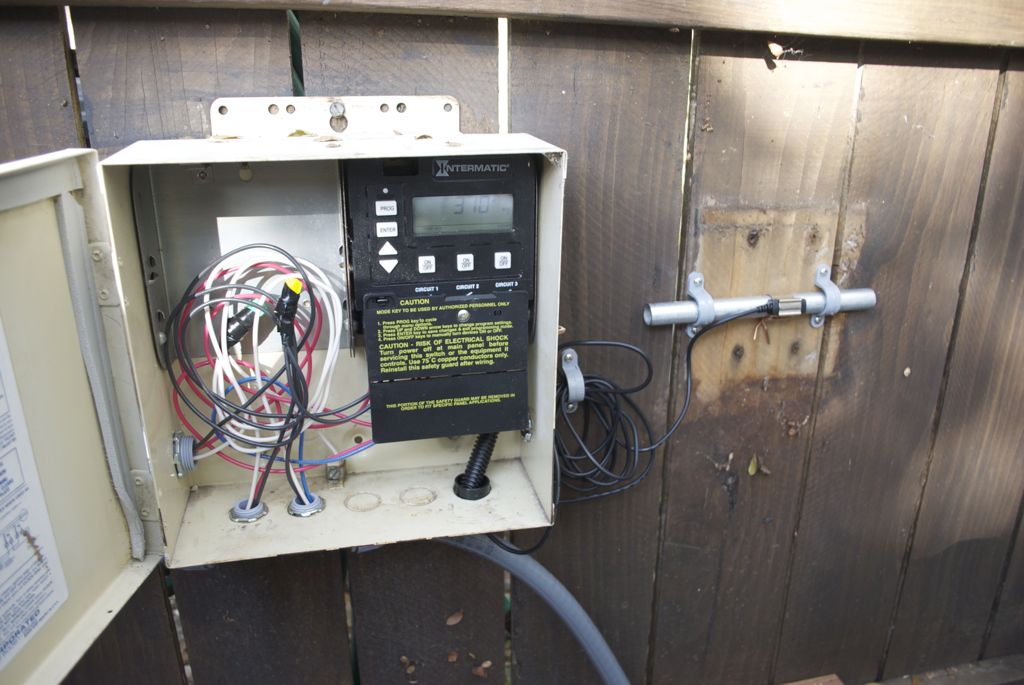
Digital motor timer and freeze sensor
I wanted to wait overnight for the patch job to dry before putting
exposing it to water and putting it under presure. I also needed to
install and program the timer. After 3 very full days of work, this
day was shaping up to be easy.
The timer I bought was a very nice device: well thought out and well
made. It is smart enough to know about two-speed pumps so that it
never energized the two wires at the same time. It is smart enough to
know that the booster pump should not be turned on until 30 seconds
after the main pump. It is smart enough to know top turn the main pump
onto high speed if you request using the booster pump. It is smart
enough to know if the temperature is below freezing to turn the pump on
to circulate the water to prevent the pipes form freezing.

Finished - view south
Finished - view north
Electric done. Timer installed. Plumbing maybe done? Time to open the
valves. Uh oh. With no pressure I had a leak, and it actually was not
a leak but an elbow I forgot to glue. There were a lot of glue joints
and a lot of dry fitting to ensure I had the right lengths and angles.
I seemed to have forgotten about this particular dry fit. With
everything else glued, it was a bit tricky to take it apart, apply glue
andput it together, but I managed it with some help from my wife
(needed four hands).
Ok, so let's try again. Open the valves, any leaks? Nope. Ok, next up
is to turn the circuit breakers back on and energize the pump motors
and see how it handles pressure. No disasters, but 3 of the 4 threaded
connection leaked. Generally, on PVC, teflon tape tends to distort the
plastic and thus is not recommended (now I know). The putty is better.
The leaks were not substantial though, so I decided to let them drip
for a few days and I'd repair them on the following weekend when I had
more time. I already had to use personal time at work to get this
done.
Miscellaneous Notes/Thoughts
There are dozens of other stories wrapped up in this project. Things I had
to redo, things I learned, things I needed to consider, reasons for
designing things a certain way, the emotional rollercoasters, etc. I
wanted to get the main points out there without bogging myself down in
spending too much time detailing the project. So whatever impression you
get from reading the above, multiply that by 10 to understand what it was
really like.